Why You'll Love It
- - The crust is buttery yet sturdy enough to hold juicy fruit.
- - Fresh fruit adds natural sweetness without added sugar.
- - Minimal ingredients, maximum flavor.
- - Ideal for making ahead and impressing guests.
*"The tarts turned out so beautifully delicate, my family couldn't stop reaching for seconds!"*
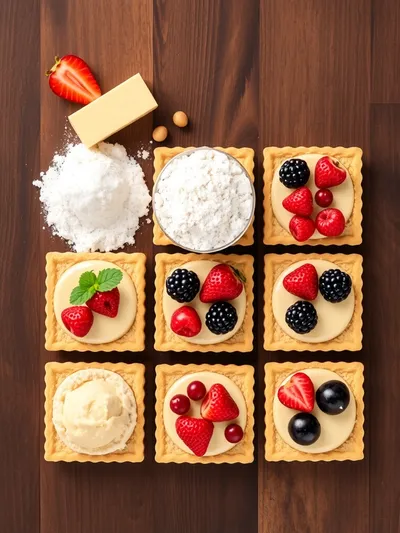
Essential Ingredient Guide
- All‑purpose flour: Choose a fine, white flour for a tender crumb; sift it to avoid lumps.
- Unsalted butter: Cold, cubed butter creates flakiness; use high‑quality butter for richer taste.
- Egg yolk (optional): Adds a golden hue to the crust; can be omitted for a lighter color.
- Fine sugar: Granulated sugar sweetens the dough without making it gritty.
- Fresh seasonal fruit: Select firm, ripe berries, stone fruit, or stone‑fruit slices for best texture.
- Apricot jam glaze: A thin glaze adds shine and a subtle tartness that balances the sweet fruit.
Complete Cooking Process
-
Ingredient Readiness:
Gather all components, chill the butter and flour mixture, and prep fruit just before assembling.
-
Flavor Development:
The butter’s steam during baking creates that signature flaky interior.
-
Texture Control:
Bake crust until lightly golden; avoid over‑baking to keep the base tender.
-
Finishing Touches:
Brush the tart tops with warm apricot glaze for a glossy finish.
-
Serving Timing:
Let tarts cool to room temperature; serve within a few hours for peak freshness.
- Chill the dough for at least 30 minutes to prevent shrinkage.
- Use a fork to dock the crust, preventing bubbles.
- Brush with egg wash for an extra golden hue if desired.
- Arrange fruit in a spiral for visual appeal.
Pro Tips
I often find that stepping back to admire the colors before glazing gives me a moment of quiet pride. The aroma of toasted butter mingles with the fresh scent of berries, and that pause feels like a gentle reminder of why cooking is comforting. Remember, you can always adjust the fruit selection based on what’s at the market; the core technique stays the same.
The essence of the dish:
A fun fact or historical angle:
Flavor or sensory focus:
You Must Know
- Use cold butter for a flaky crust.
- Do not over‑mix the dough.
- Glaze while the fruit is still warm.
Frequently Asked Questions
→ Can I make the crust ahead of time?
Yes, you can refrigerate the rolled‑out crust for up to 24 hours; just cover it tightly with plastic wrap.
→ What fruits work best?
Berries, sliced kiwi, peaches, and plums all provide vivid color and pleasant texture.
→ How do I prevent the crust from becoming soggy?
Brush the baked crust with a thin layer of apricot glaze before adding fruit; this creates a moisture barrier.
→ Can I use a gluten‑free flour blend?
Absolutely—replace all‑purpose flour with a 1:1 gluten‑free blend, but expect a slightly different crumb.
→ Is there a dairy‑free version?
Swap butter for a plant‑based solid fat like coconut oil; the flavor will be subtly different but still delightful.
→ How long do the tarts keep?
Store in an airtight container at room temperature for up to 2 days, or refrigerate for 3‑4 days.
Chef's Tips
If using very juicy fruit, pat them dry before arranging on the tart.,The glaze can be swapped for a light honey‑citrus drizzle for a different flavor profile.,Allow the tart to rest for 10 minutes after glazing so the fruit sets.
Nutrition Facts
per serving
260
Calories
3g
Protein
32g
Carbs
12g
Fat
Taste Profile
A balanced sweet‑tart flavor with bright fruit notes
Ingredient Substitutions
Don't have an ingredient? Try these alternatives
Use a 1:1 replacement; expect a slightly crumblier crust.
Gives a subtle coconut aroma; keep it cold.
Recipe Variations
Try these delicious twists on the original
Spicy Version
Add a pinch of cayenne to the glaze for a subtle heat that brightens the fruit.
Mediterranean Style
Top with sliced figs, toasted almonds, and a drizzle of honey for a sun‑kissed twist.
Common Mistakes to Avoid
Learn from others' mistakes for perfect results
- Over‑mixing dough leads to a tough crust.
- Skipping the chilling step causes shrinkage.
- Adding fruit before the crust is fully baked makes it soggy.
Meal Prep & Storage
Make Ahead Tips
The crust can be baked and stored in an airtight container for up to 2 days; glaze and add fruit just before serving.
Leftover Ideas
Reheat gently in a low oven (300°F) for 5‑7 minutes to revive the crust’s crispness.
Perfect Pairings
Serve this with...
Cooking Timeline
Gather and measure all ingredients; chill butter.
Mix dry ingredients, cut in butter, add yolk and water to form dough.
Chill dough, preheat oven, roll out crust, and blind‑bake.
Prepare glaze, arrange fruit, and finish glazing.
Cool slightly, slice, and serve.
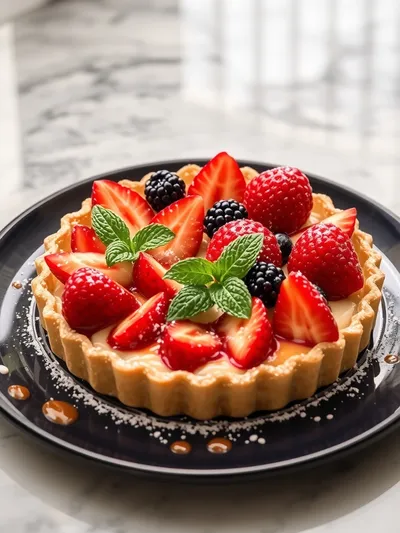
Classic Fruit Tarts
These classic fruit tarts combine a buttery, crumbly crust with a glossy glaze of fresh seasonal fruit, creating a sweet, crisp bite that feels like a quiet celebration of summer on a plate.
Timing
Prep Time
30 Minutes
Cook Time
20 Minutes
Total Time
50 Minutes
Recipe Details
Ingredients
Crust
- 01 1 ½ cups all‑purpose flour
- 02 ¼ cup fine sugar
- 03 ¼ tsp salt
- 04 ¾ cup cold unsalted butter, cubed
- 05 1 egg yolk
- 06 2‑3 tbsp ice‑water
Fruit Topping
- 01 2 cups mixed fresh fruit (berries, sliced peaches, kiwi)
- 02 2 tbsp apricot jam
- 03 1 tsp lemon juice
- 04 Optional: fresh mint leaves for garnish
Instructions
In a bowl, whisk flour, sugar, and salt; add cold butter and cut it in until the mixture resembles coarse crumbs.
Stir in the egg yolk and ice‑water just until the dough comes together; shape into a disk, wrap, and chill for 30 minutes.
Preheat oven to 375°F (190°C). Roll the dough on a lightly floured surface and fit into a 9‑inch tart pan; prick the base with a fork.
Bake the crust for 12‑15 minutes, until lightly golden. Remove and let cool slightly.
While the crust cools, gently warm apricot jam with lemon juice to make a glaze. Brush the crust, arrange fresh fruit artfully, then brush the fruit with the warm glaze.
Notes & Tips
- 1 If using very juicy fruit, pat them dry before arranging on the tart.
- 2 The glaze can be swapped for a light honey‑citrus drizzle for a different flavor profile.
- 3 Allow the tart to rest for 10 minutes after glazing so the fruit sets.
Tools You'll Need
-
Rolling pin
-
9‑inch tart pan
-
Mixing bowls
-
Pastry brush
-
Sharp knife
Must-Know Tips
- Don't over‑mix the dough; it leads to a tough crust.
- Chill the dough well to prevent shrinking.
- Arrange fruit in layers for even moisture distribution.
Professional Secrets
- Use ice‑cold butter for maximum flakiness.
- Dock the crust to avoid air pockets.
- Glaze while the jam is warm for a perfect sheen.

Recipe by
Amelia HartChef Amelia Hart is a dessert enthusiast who loves creating elegant cakes, cookies, and baked treats. Her baking style combines classic pastry techniq ...
Get Delicious Recipes Weekly
Join 25,000+ home cooks getting our best recipes straight to their inbox.
Free forever • No spam • Unsubscribe anytime