Why You'll Love It
- - Bite‑sized convenience for parties
- - Sweet‑tart pineapple contrast
- - Creamy cheesecake filling adds depth
- - Easy to freeze and serve later
*These little cheesecakes melt in the mouth and look gorgeous on a platter.*
Essential Ingredient Guide
- Pineapple rings: Choose canned rings in juice, drain well, and pat dry for optimal caramelization.
- Cream cheese: Use full‑fat cheese, softened to room temperature for a smooth batter.
- Butter: Unsalted butter gives a richer crust and caramel flavor.
- Brown sugar: Adds deep molasses notes that complement the pineapple.
- Lemon juice: A splash brightens the filling and balances sweetness.
- Vanilla extract: A subtle aroma that ties the buttery crust to the cheesecake.
Complete Cooking Process
-
Ingredient Readiness:
Soak the graham cracker crumbs with melted butter, soften the cheese, and pat the pineapple dry before assembling.
-
Flavor Development:
Caramelize the pineapple with brown sugar in the ramekin, letting the aroma fill the kitchen.
-
Texture Control:
Mix the cheesecake batter just until combined to keep it light and airy.
-
Finishing Touches:
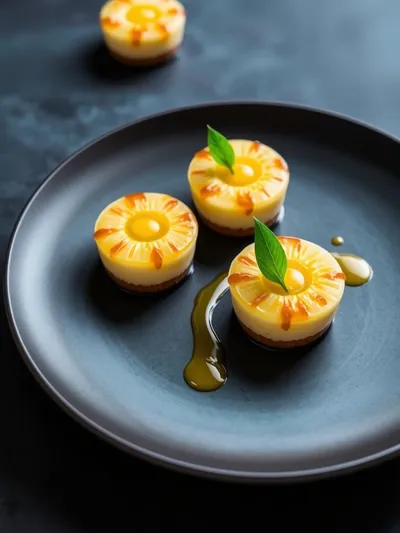
After baking, let the mini cheesecakes rest briefly, then garnish with a mint leaf for freshness.
-
Serving Timing:
Serve warm or at room temperature; the crust softens slightly, enhancing the melt‑in‑your‑mouth feel.
- Use a water bath to prevent cracks in the cheesecake.
- Don’t over‑mix the batter; it keeps the texture light.
- Chill the ramekins before filling for a tighter crust.
- Add a pinch of sea salt to the caramel for depth.
Pro Tips
Well, these little tricks make the difference between a good bite and a great one. Honestly, the water bath feels like a secret, but it really helps the cheesecake stay smooth and creamy. And when the crust turns a golden amber, you’ll hear that faint sizzle that tells you it’s ready. Yeah, take a moment to admire the little tops before plating—they’re little works of art.
The essence of the dish:
A fun fact or historical angle:
Flavor or sensory focus:
You Must Know
- Cool the ramekins before filling
- Avoid over‑baking; the center should wobble slightly
- Serve within 2 hours for optimal texture
Frequently Asked Questions
→ Can I make these ahead of time?
Yes, you can bake them up to 24 hours in advance and store them sealed in the refrigerator.
→ What crust can I use instead of graham crackers?
A simple shortbread crust made from flour, butter, and sugar works beautifully.
→ Do I need a water bath?
A water bath helps prevent cracks and ensures gentle, even cooking.
→ Can I freeze the mini cheesecakes?
Absolutely—freeze after cooling, then thaw in the fridge before serving.
→ How do I get a glossy pineapple top?
Brush the pineapple with a little melted butter and brown sugar before baking.
→ Is there a dairy‑free version?
Swap cream cheese for a firm vegan cheese and use coconut oil in the crust.
Chef's Tips
If the pineapple tops brown too quickly, cover with foil halfway through baking.,For extra caramel depth, add a pinch of sea salt to the topping mixture.,Allow the cheesecakes to come to room temperature before serving for the best texture.
Nutrition Facts
per serving
210
Calories
4g
Protein
24g
Carbs
12g
Fat
Taste Profile
A balanced sweet‑tart profile with creamy richness
Ingredient Substitutions
Don't have an ingredient? Try these alternatives
Use a brand that melts well; adjust sweetness if needed.
Provides a gluten‑free crust with a nutty flavor.
Recipe Variations
Try these delicious twists on the original
Spicy Version
Add a pinch of cayenne and a drizzle of honey to the topping for a gentle heat.
Mediterranean Style
Swap pineapple for thinly sliced figs and sprinkle crumbled feta on top.
Common Mistakes to Avoid
Learn from others' mistakes for perfect results
- Over‑mixing the batter, which makes the filling dense.
- Skipping the water bath, leading to cracks.
- Leaving the pineapple wet, resulting in soggy tops.
Meal Prep & Storage
Make Ahead Tips
You can prepare the crust and topping layers a day ahead, store them separately, and assemble just before baking.
Leftover Ideas
Reheat gently in a low oven (300°F) for 5‑7 minutes, or enjoy cold straight from the fridge.
Perfect Pairings
Serve this with...
Cooking Timeline
Preheat oven, prepare crust mixture, and press into ramekins.
Arrange pineapple rings, brush with butter‑sugar glaze.
Mix cheesecake batter and pour over fruit.
Bake in water bath, then cool and refrigerate.
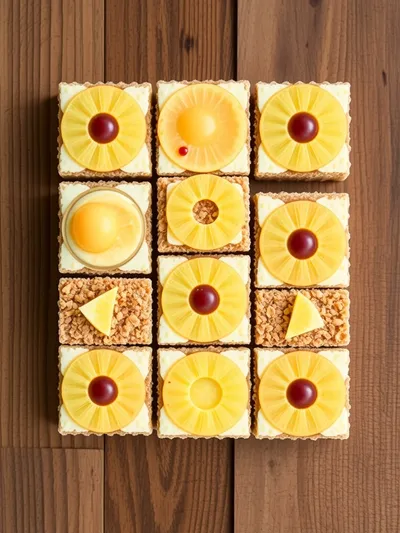
Mini Pineapple Upside-Down Cheesecakes
Delicious bite‑size pineapple upside‑down cheesecakes with buttery crust, caramelized fruit and creamy topping that melt in your mouth.
Timing
Prep Time
20 Minutes
Cook Time
25 Minutes
Total Time
45 Minutes
Recipe Details
Ingredients
Crust
- 01 1 cup graham cracker crumbs
- 02 4 tbsp unsalted butter, melted
- 03 2 tbsp brown sugar
Filling
- 01 8 oz cream cheese, softened
- 02 1/4 cup granulated sugar
- 03 1 egg
- 04 1 tsp vanilla extract
- 05 1 tbsp lemon juice
Topping
- 01 12 canned pineapple rings, drained
- 02 2 tbsp brown sugar
- 03 1 tbsp butter, melted
Instructions
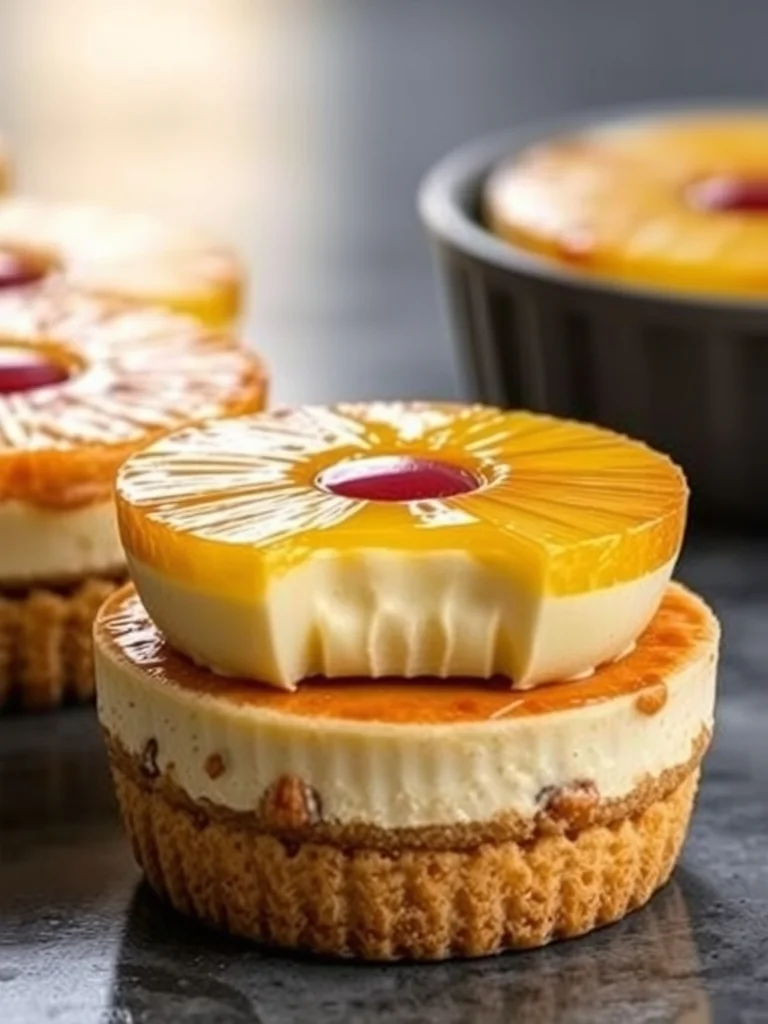
Preheat the oven to 350°F (175°C). Combine graham cracker crumbs, melted butter, and brown sugar; press the mixture into the bottom of twelve 4‑oz ramekins.
In a small bowl, mix melted butter with brown sugar, then brush each pineapple ring and place it on top of the crust in each ramekin.
In a large mixing bowl, beat cream cheese until smooth, add sugar, egg, vanilla, and lemon juice; mix just until combined. Pour the batter over the pineapple rings, filling each ramekin about three‑quarters full.
Place the ramekins in a larger baking pan, pour hot water halfway up the sides of the ramekins, and bake for 20‑25 minutes until the edges are set and the center still has a gentle wobble.
Remove from the water bath, let cool on a wire rack, then refrigerate for at least 2 hours before unmolding.
Notes & Tips
- 1 If the pineapple tops brown too quickly, cover with foil halfway through baking.
- 2 For extra caramel depth, add a pinch of sea salt to the topping mixture.
- 3 Allow the cheesecakes to come to room temperature before serving for the best texture.
Tools You'll Need
-
12‑oz ramekins
-
Mixing bowls
-
Hand mixer or whisk
-
Measuring cups and spoons
-
Baking pan for water bath
-
Wire rack
Must-Know Tips
- Don't over‑mix the cheesecake batter; it keeps the texture light.
- Use a water bath to avoid cracks and ensure even cooking.
- Cool the ramekins before filling for a tighter crust.
Professional Secrets
- Room temperature cream cheese ensures a silky batter.
- High heat at the start gives the pineapple a quick caramelization.
- Gentle cooling prevents the crust from becoming soggy.

Recipe by
Amelia HartChef Amelia Hart is a dessert enthusiast who loves creating elegant cakes, cookies, and baked treats. Her baking style combines classic pastry techniq ...
Get Delicious Recipes Weekly
Join 25,000+ home cooks getting our best recipes straight to their inbox.
Free forever • No spam • Unsubscribe anytime